ScrollTrigger from GreenSock is the new ScrollMagic, simple as that! And this is a simple ScrollTrigger tutorial for beginners.
Do you want to trigger your GSAP animations as the user scrolls down the page? You might have used ScrollMagic in the past, now it is ScrollTriggers turn.
ScrollTrigger does what ScrollMagic did and much more, and the best thing about it is the awesome cross-browser support, active development, and the very helpful GreenSock Forum to ask questions if you get stuck.
What will you learn:
- How to include GreenSock and ScrollTrigger in your project
- How to trigger your animation
- How to scrub through your animation
- How to define duration of scrolling animation
If you prefer to learn by watching videos feel free to join me in GreenSock 101.
How to include GreenSock and ScrollTrigger in your project

ScrollTrigger is a free plugin from GreenSock and the easiest way to include it in your projects is to get the link from the CDN.
<script src="https://cdnjs.cloudflare.com/ajax/libs/gsap/3.5.1/gsap.min.js"></script>
<script src="https://cdnjs.cloudflare.com/ajax/libs/gsap/3.5.1/ScrollTrigger.min.js"></script>
Include the above links at the bottom of your HTML page.
If you are using a module bundler such as Webpack or Parcel, you can install GreenSock through NPM and import it to your project.
// install GSAP
npm install gsap
// or
yarn add gsap

// import GSAP and ScrollTrigger
import { gsap } from "gsap";
import { ScrollTrigger } from "gsap/ScrollTrigger";

// register ScrollTrigger
gsap.registerPlugin(ScrollTrigger);
You will need to register ScrollTrigger in your module to avoid it being removed by treeshaking.
If you want to use it in your React project check out How to use ScrollTrigger with React.
How to trigger your animation

Firstly we will create the HTML markup for the header and give it some padding-top and bottom.

<header>
    <div class="scrollTriggerLogo">
       <img src="..." />
    </div>
    <h1>ScrollTrigger Tutorial for Beginners</h1>
</header>
Now we want to fade out the header before it leaves the viewport.
gsap.to('header', { autoAlpha: 0 });
This would fade it out straight on page load, but we want the user to trigger the start of this tween.
gsap.to('header', { autoAlpha: 0,
    scrollTrigger: {
        trigger: '.scrollTriggerLogo',
        start: 'top top+=100',
        markers: true
    }
});
We create a simple GSAP .to tween and fade the header out to autoAlpha: 0. This is GSAP’s shorthand for animating both the opacity and visibility.
Then we are specifying the ScrollTrigger with some options for this tween.
.scrollTriggerLogo is the trigger element that will trigger our animation.
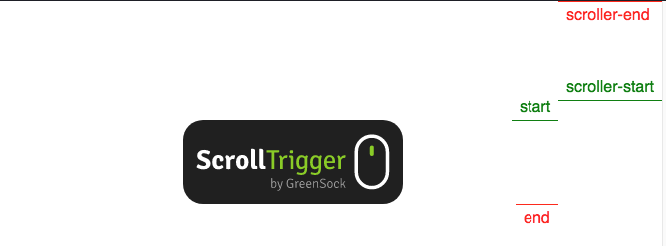
By default, every ScrollTrigger animation is triggered when the top of the trigger hits the bottom of the viewport, but we can overwrite it by specifying start: 'top top+=100'.

With these settings, it will be triggered when the top of .scrollTriggerLogo is 100px from the top of the viewport.
markers: true is a handy way to see visually when the animation is triggered.
When the start label meets the scroller-start, good things happen.
Enjoying this ScrollTrigger tutorial for beginners? Join me in GreenSock 101 to learn even more.
How to scrub through your animation

The above example will fade out the header over the duration of 1 second, but what if we wanted the user to be in control of the fading out?

We can specify scrub: true to make this happen.
gsap.to('header', { autoAlpha: 0,
    scrollTrigger: {
      ...
      scrub: true,
      ...
    }
});
The fading out is now controlled by the scrollbar. If you scroll down slowly, it will fade out slowly.
Now you are scrubbing through the tween.
How to define the duration of scrolling animation

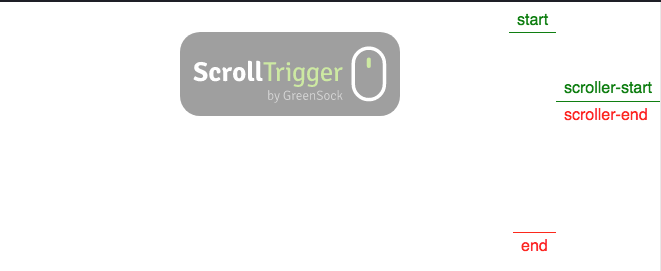
By default, every scrub animation will be completed when the bottom of the trigger element hits the top of the viewport.
You can customize this by specifying your own end value.
gsap.to('header', { autoAlpha: 0,
    scrollTrigger: {
      ...
      end: '+=200',
      ...
    }
});
end: '+=200' means that the tween will end after scrolling 200px beyond the start.
When the end meets the scroller-end, your tween or timeline will be fully completed.

Other options for the end value could be an absolute value in pixels.
end: 300 would mean that it would take 300px of scrolling down to complete the tween, regardless of where the start is.
You most likely want to use the first option, unless your element is at the top of the page.
Final Demo
4864
Conclusion
Now you know how to create a simple GreenSock tween and trigger it at the right time using ScrollTrigger.
You have also learned how to set a custom start and end values to be in full control of your scrolling animation.
In the next part of this tutorial, you will learn how to use toggleActions, toggleClass, and how to set function based values for your scrollTrigger.
Do you want to learn more about GreenSock and ScrollTrigger? Join me in the free online course GreenSock 101 or step it up in the premium Practical GreenSock.
The post ScrollTrigger Tutorial for Beginners – Part 1 appeared first on Ihatetomatoes.